 The first 3 days of our Vegas to Denver road trip were spent in Zion National Park. And when I say 3, I really mean 2. Because day one was eaten up by the logistics of picking up the campervan, loading up on supplies, and the drive from Las Vegas.
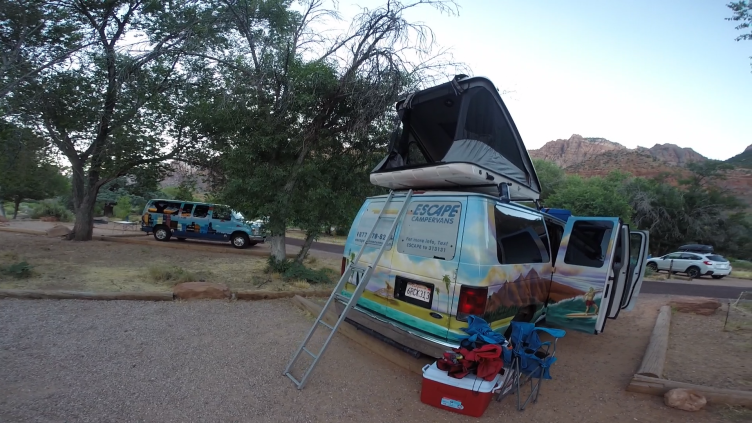
We arrived at Watchman Campground (where we were lucky enough to get site reservations) Early Friday evening. The campground is very open and pretty much devoid of privacy (or shade, in our case), but the location can’t be beat. Typical of the National Park campgrounds we have stayed in so far, the convenience of being steps away from the visitor’s center and shuttle requires sacrificing some solitude.
Day One – Hiking the Subway (Bottom-up day hike route)
- Mileage: 8-9 miles round trip, out and back
- Requirements: hiking permit
- Safety points – Keep a VERY close eye on the weather – rain can cause extremely dangerous conditions in the canyon areas of Zion. Many lives have been lost due to flash flooding. Keep a watchful eye on the forecast and avoid canyon areas if there is rain forecast, or if it looks at all like a storm might be coming in.
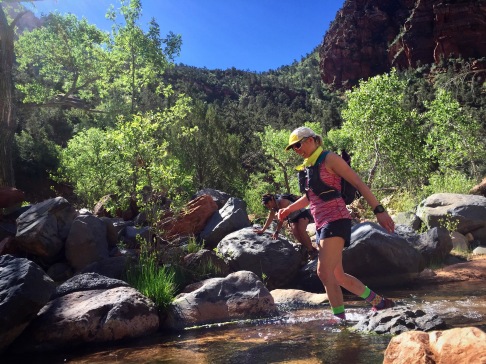
- Terrain – Uneven footing, sandy/rocky steep trail to and from the parking area. Boulders, rocks, down trees, and water to navigate along the creek bed. Slippery rock with flowing water leading into the Subway.
- Recommended Gear: Map/guidebook; at least 2L of water; water filter system (I like the Sawyer Squeeze); sunscreen; sunglasses; hat; trekking poles (if you are used to using them or have balance issues – I found I didn’t use mine at all, they just got in the way); Snacks/lunch; handkerchief/buff to keep sun off your neck and to dip in the water to cool yourself off; trail/water shoes (we all used our trail runners, which we are comfortable in and I found to be perfect for these conditions) – your feet WILL be wet so plan for that.
- Hiking Time: It took us 7 hours at a moderate (for us – we are very fit) pace, with frequent stops for pictures, snacks, and a quick cannonball into a deep pool. Count on a long day of hiking.
**Important point – the starting point for this hike (Left Fork Trailhead) is outside the main area of the park, so you will need to drive to it. Normal park shuttles will not take you here**
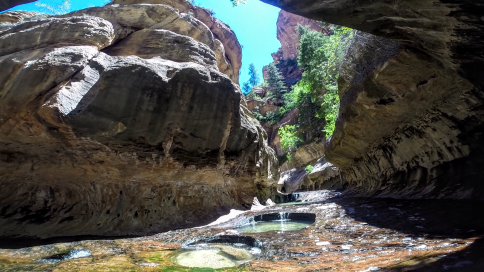
The Subway has two routes – bottom up (a day hike) and top down (technical canyoneering route). Both require a permit, which is available through an online lottery. We have ZERO canyoneering experience, so opted for the day hike, traveling up the Left Fork of the North Creek to the “subway” feature.
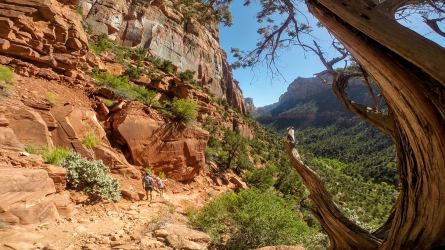
The hike starts out with a mile (ish) long descent into the canyon and down to North Creek, which you will follow for the remainder of the hike. There were some fairly steep parts with rocks and sand. The most important thing to remember is that you will be coming back up this at the very end of your hike. It will likely be hot and you will certainly be tired, so be sure you have some water (and energy!) left for this part.
After reaching the creek, turn left and follow the creek. It’s just that simple.
**Note where you left the trail and entered the creek bed. You will need to find this entry point to get back out once you are done, and it is easy to miss coming the other way, especially on tired legs. Be careful, and watch closely on the way back. Someone had made some arrows with rocks when we came through, which was super helpful since everything starts to look the same by that point**

There are some trails you can follow along the edges, but there are many areas where you are just boulder hopping or wading along the middle of the creek. It is an interesting hike, and really fun to splash in and out of the water, especially in hot weather (our hike was early June, and it was in the mid 90s and sunny. Hot. Surface of the sun hot.)
A lot of the guidebooks and websites framed this as a “meh” hike. Long, need a permit, and relatively low yield. I suppose if the only part you are interested in is the subway at the end then yeah, you might not dig spending 7 hours boulder hopping and creek wading to get to it. If you have the time and the fitness, I would definitely recommend giving this a go (weather and permit lottery permitting, of course). We had the trail to ourselves all day, which I found surprising but very welcome given we were in an extremely popular National Park. Plenty of solitude and fun to be had out there. We were even the only ones in the subway once we got there, which was a big bonus for picture taking.


 In our humble, nature-loving opinions, this hike was absolutely worth the effort. Scrambling and splashing our way up the creek was unique and tons of fun. The Subway feels like you are in some sort of hidden subterranean world for a minute. The green of the water contrasted against the rock walls is so beautiful. Give this hike a try, it’s worth it!
Recommended Planning resources:
- Hiking From Here to Wow: Utah Canyon Country

- Zion National Park Trail Map
-

- Citrus Milo Zion Park Guide
- http://www.zionnational-park.com/
- The Outbound – Subway Bottom Up Hike
- National Park Service -Zion National Park
- NPS site with very valuable information regarding trail permits, current weather conditions, trail closures and conditions, shuttle schedules. Be sure to browse this and read up on what you will need for your visit!
Up Next… Day Two of Zion. Angel’s Landing AND the Narrows. (Yes, in ONE day). (Yes, we are a little nuts).

I love, love, LOVED OUR TRIP!!! And can’t wait for the next one. I can’t believe how damn hot it was. Or, how beautiful. To our next adventure!!!!
LikeLike
Yes, Yes, YES!!!! So much fun. What a stunning place. Even better with the gang. I can’t WAIT for our next adventure.
LikeLiked by 1 person